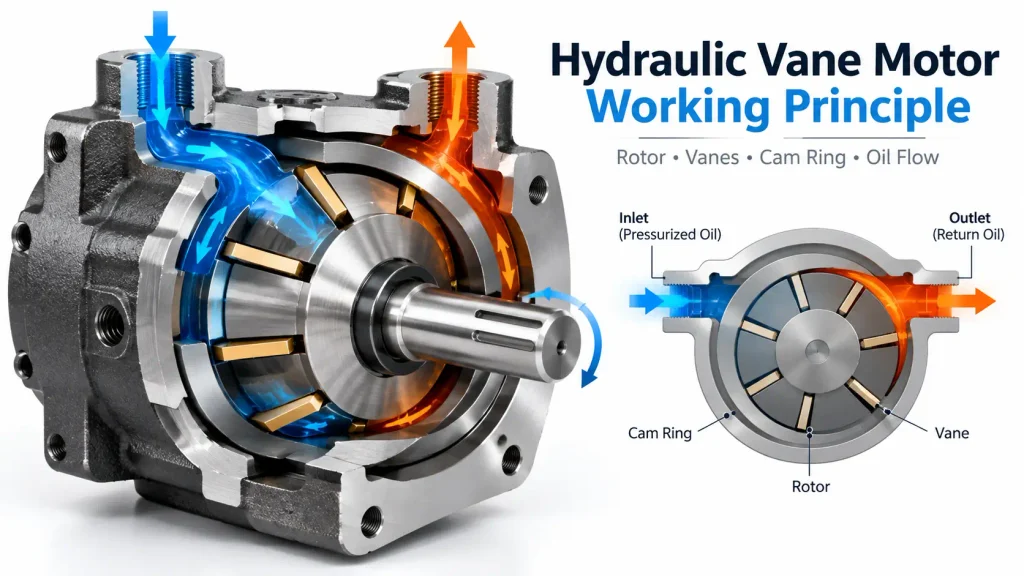
Vane pumps are a popular choice in industrial and mobile hydraulics because they run quietly, deliver steady flow and cost less than piston pumps. Their weakness is the same feature that makes them efficient: the vanes slide at high speed against the cam ring, and the tight internal clearances are easily opened up by contaminated fluid and excess heat. Problems usually announce themselves first as a change in sound, flow, pressure or oil temperature.
The seven most common vane pump problems are cavitation and aeration, internal leakage that reduces flow and pressure, abnormal noise and vibration, overheating and low efficiency, wear of the vanes, rotor and cam ring, external leakage from the shaft seal and gaskets, and failure to prime or complete loss of output. Most trace back to fluid contamination, excessive heat, incorrect viscosity, or installation and alignment errors. Identifying the problem from its symptom before dismantling the pump is the fastest route to a repair that lasts.
This guide covers each problem in turn, then the shared root causes, a field diagnostic table, and preventive maintenance.
What Are the Most Common Vane Pump Problems?
Vane pumps most often fail from cavitation and aeration, internal leakage, excessive noise and vibration, overheating, wear on the vanes, rotor and cam ring, external leakage at the shaft seal, and loss of prime. The first evidence is usually a change in sound, flow, pressure or oil temperature rather than an obvious mechanical break.
The table maps each problem to the symptom that reveals it and to the cheapest check to perform first.
| Problem | Main Symptom | First Check |
| Cavitation and aeration | Whining or marbles-like rattle | Suction line and oil level |
| Internal leakage | Falling flow and pressure | Flow at test pressure |
| Noise and vibration | New or louder sound | Mounting and alignment |
| Overheating | Oil temperature above normal | Relief valve and leakage |
| Vane, rotor and cam ring wear | Gradual efficiency loss | Cleanliness and running hours |
| External leakage | Oil at shaft or end cover | Seal, shaft and case pressure |
| Loss of prime | No output at start-up | Rotation, oil level, suction |
1. Cavitation and Aeration
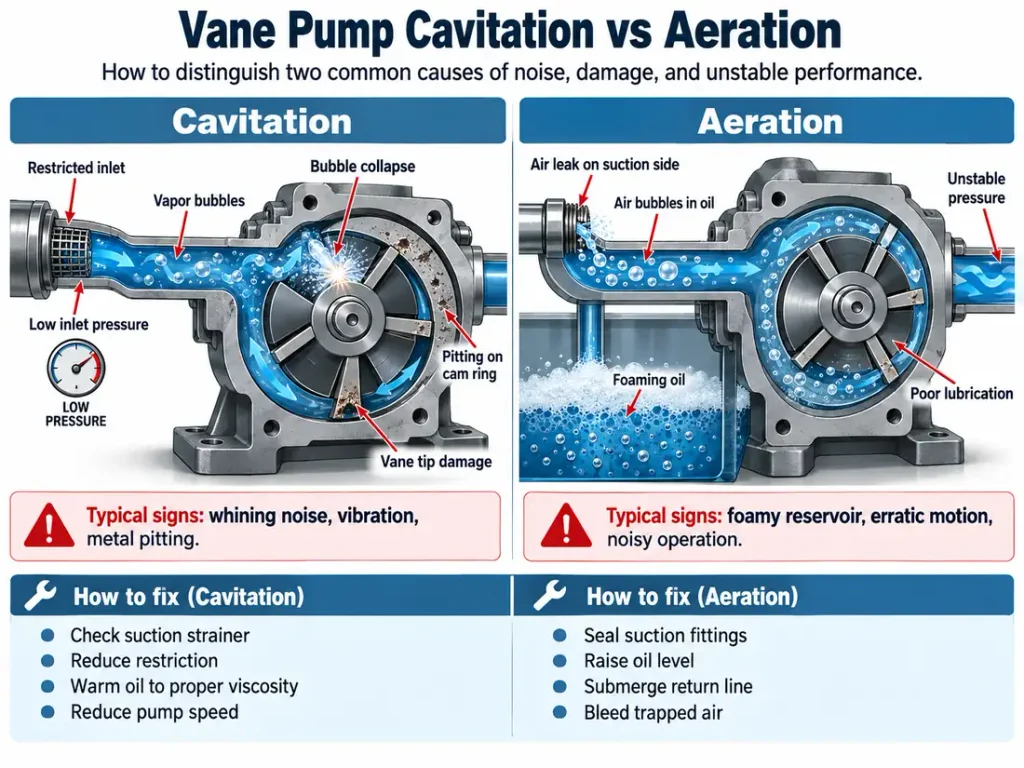
Cavitation and aeration are among the most common causes of abnormal vane pump noise and of pitting damage to the vanes and cam ring. Cavitation occurs when inlet pressure falls below the vapour pressure of the oil, so bubbles form and then collapse violently against metal surfaces. Aeration occurs when air is drawn in through a suction-side leak, which reduces lubrication and makes the pump run roughly.
Cavitation is local: each collapsing bubble drives a micro-jet of fluid against the vane tip and the cam ring, removing material a few microns at a time until the surface is pitted. Aeration is bulk: entrained air lowers the stiffness of the fluid, so pressure response turns spongy and the oil oxidises faster. The sequence from inlet restriction to vane damage is set out in the guide on vane pump working principle.
Cavitation gives a harsh, high-frequency rattle often described as marbles passing through the pump, while aeration is softer and usually shows as foam in the reservoir. A cavitating pump quietens when load is removed; an aerated system stays rough until the air works out.
Common Causes and Fixes
- Clogged or undersized suction strainer; clean or replace the element.
- Suction line too long, narrow or full of elbows; increase the bore and straighten the run.
- Viscosity too high at cold start; preheat the oil or use a higher viscosity index fluid.
- Reservoir level too low; top up and check for vortexing at the inlet.
- Air leaks at suction fittings and hoses; pressure-test and seal the suction side.
- Pump speed above the rated range; return to the specified speed.
2. Internal Leakage Causing Low Flow and Low Pressure
Internal leakage is the most common mechanical cause of low flow and low pressure in a vane pump. As the vane tips, cam ring, rotor and side plates wear, the clearance between the high-pressure and low-pressure chambers opens up, and a growing share of the flow recirculates inside the pump instead of reaching the system.
Symptoms include actuators that move slowly or lose force under load, pressure that will not reach the relief valve setting, oil temperature rising faster than usual for the same duty, and flow that falls as the oil warms. External noise usually stays normal, which distinguishes internal leakage from cavitation.
To diagnose it, measure delivery flow at roughly a quarter, half and full rated pressure and compare the result with the pump performance curve. A healthy pump loses a small, near-linear amount of flow as pressure rises, while a worn pump loses flow steeply and the gap widens at operating temperature. Case drain flow is a second indicator, and both tests run with the pump in place. Once leakage is confirmed, replace the rotating group as a complete set, verify axial clearances, and improve filtration.
3. Abnormal Noise and Vibration
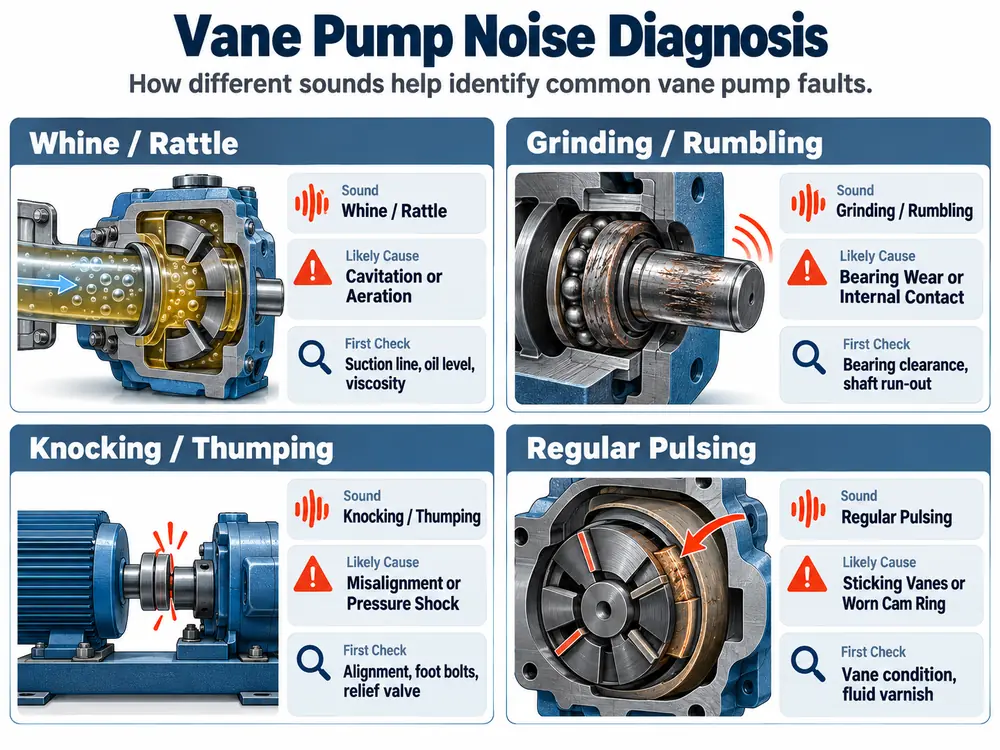
Abnormal noise is often the first sign of a developing problem, and the character of the sound points to the cause. A high-pitched whine or marbles-like rattle usually indicates cavitation or aeration. Grinding or rumbling points to bearing wear or internal mechanical contact. Knocking is more often linked to misalignment, a loose mounting or pressure shock.
| Sound | Likely Source | First Check |
| High-pitched whine or rattle | Cavitation or aeration | Suction line, oil level, viscosity |
| Grinding or rumbling | Bearing wear or internal contact | Bearing clearance, shaft run-out |
| Knocking or thumping | Misalignment, loose mounting, pressure shock | Alignment, foot bolts, relief valve |
| Regular pulsing | Sticking vanes or worn cam ring | Vane condition and fluid varnish |
Sound is a clue, not a diagnosis. Use temperature measurements, pressure gauges, flow testing, and vibration or noise observations before dismantling the pump: confirm oil level and temperature, read system pressure, measure flow, check inlet pressure with a vacuum gauge, and only then remove the pump. The usual mechanical sources are worn mounting feet and coupling inserts, misaligned shafts, failing bearings, unsupported pipework, and vanes sticking in their slots.
4. Overheating and Low Efficiency
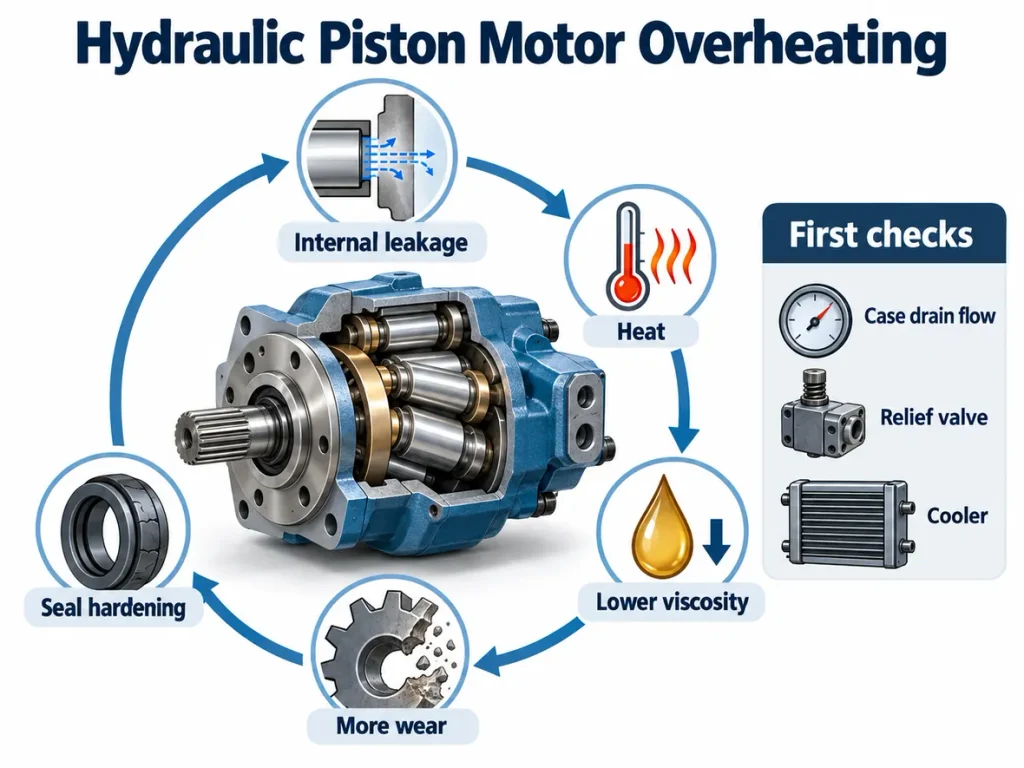
Vane pump overheating is often caused by internal leakage, excessive relief-valve bypass, incorrect oil viscosity, or inadequate cooling. Each converts pressure energy into heat rather than useful work, so overheating rarely has a single cause and the pump is not always the origin.
- Internal leakage. Fluid escaping across worn clearances is throttled back to low pressure, and the energy difference appears as heat.
- Excessive relief-valve bypass. A pump oversized for its duty sends most of its flow over the relief valve at full pressure, a continuous heat input with no useful work.
- Incorrect viscosity. Oil that is too thin leaks more; oil that is too thick increases friction and inlet resistance.
- Inadequate cooling. A fouled or undersized heat exchanger cannot reject the heat the circuit generates.
Measure oil temperature in the reservoir and at the case drain under representative duty, and bring it into the recommended band for the fluid in use, typically around 60 degrees Celsius for mineral oil. Then re-check the relief valve setting, consider a variable displacement pump that matches flow to demand, clean the heat exchanger, and confirm the viscosity grade against actual operating temperature.
5. Vane, Rotor, and Cam Ring Wear
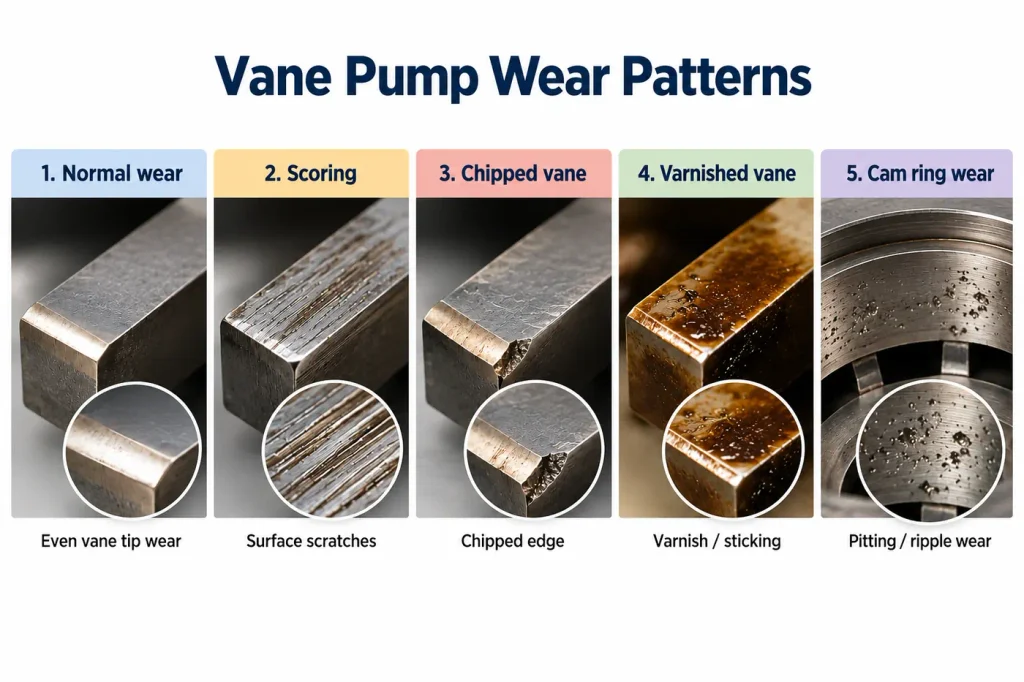
Vane tips and the cam ring carry the highest sliding loads inside a vane pump, so together they set the service life of the unit. Wear narrows the sealing gap between them, which is the same mechanism behind internal leakage, but the wear pattern itself reveals what caused it.
| Wear Pattern | Likely Cause |
| Uniform vane-tip wear | Normal service wear after extended running |
| Long scratches or scoring | Particle contamination in the fluid |
| Chipped or broken vane edge | Shock load or pressure spike |
| Varnished or sticking vanes | Oxidized oil, varnish or sludge |
| Stepped or rippled cam ring | Prolonged operation above rated pressure |
Uniform wear means the pump has reached the end of its service interval. Scoring is almost always contamination, because hard particles trapped between the tip and the cam ring cut grooves that become leak paths. Chipped edges point to pressure spikes from fast-closing valves or abrupt load changes. Varnish and sticking vanes are a fluid chemistry problem that will reappear after a rebuild unless the oil issue is corrected. Replace the vanes as a complete set, inspect rotor slots for burrs, and where the housing, shaft or cam ring has reached its own limit, a new fixed displacement hydraulic vane pump is normally more reliable than rebuilding around worn parts.
6. External Leakage From Shaft Seals and Gaskets
External leakage at the shaft seal is one of the most frequently reported vane pump failures, but the seal is often a symptom rather than the cause. Bearing wear, misalignment, hardened elastomers from prolonged overheating, and excessive case pressure all damage the sealing surface or lift the seal lip, so replacing the seal alone rarely solves the problem for long.
The usual root causes are bearing failure that lets the shaft run out and work the seal lip, seal hardening after long periods at elevated temperature, particles embedding in the lip and cutting a groove in the shaft, a blocked case drain raising case pressure, unevenly tightened end cover bolts, and damaged gasket faces. Clean the pump exterior and trace the leak point before opening anything, since oil travels along the housing and can mislead the diagnosis. Then confirm the case drain discharges below the reservoir oil level, measure shaft run-out, replace the seal with a material matched to the fluid and temperature such as NBR, FKM or PTFE, and correct alignment and bearings at the same time.
7. Failure to Prime or Complete Loss of Output
Complete loss of output should first be checked for external causes such as rotation direction, suction blockage, low oil level, or drive failure before assuming internal pump damage. A vane pump that produces no flow at start-up is more often starved of oil or driven the wrong way than it is internally broken.
Common causes include a drive rotating opposite to the direction marked on the housing, a blocked suction line or strainer, a reservoir level below the suction inlet, a pump mounted above the fluid level without a foot valve, a variable displacement control stuck at zero eccentricity, a failed drive shaft or key, and air trapped in the pump cavity after installation. Confirm rotation against the arrow on the pump, prime and bleed at the highest point in the circuit at low speed with the system unloaded, fill the reservoir and clear the suction line, fit a foot valve or flood the inlet, and on variable units verify that the control restores displacement when commanded.
What Are the Most Common Causes of Vane Pump Failure?
Fluid contamination, excessive heat, and incorrect viscosity are among the most common root causes of vane pump failure, and installation errors such as misalignment act as accelerators. Because they affect every vane pump regardless of type or application, they are worth addressing before any individual component is replaced. The clearances that make the pump sensitive to them are described in the overview of what is a vane pump.
Fluid Contamination
Hard particles score vane tips and the cam ring, water corrodes the rotor and side plates, entrained air produces aeration, and fluid breakdown products form varnish that sticks the vanes in their slots. Control measures include return-line, pressure-line and offline kidney-loop filtration, supported by fluid sampling against a target cleanliness code, as defined in the standard on coding the level of contamination by solid particles.
Thermal Degradation
Above its design band a hydraulic fluid oxidises rapidly, consumes its additives and begins to form varnish and sludge. A widely used rule of thumb is that fluid life halves for every ten degrees Celsius of sustained operation above the recommended limit. Heat also hardens elastomer seals and thins the film at the vane tips.
Incorrect Fluid Viscosity
Oil that is too thin leaks internally and loses volumetric efficiency. Oil that is too thick starves the inlet at cold start and can prevent the vanes from sliding freely out of their slots. Use the grade specified for the pump, weighted towards the temperature at which the machine actually runs.
Installation and Alignment Errors
Misalignment loads the bearings, works the shaft seal and adds vibration. A soft base flexes under load, unsupported pipework transmits resonance into the housing, and an undersized or kinked case drain raises case pressure and can lift the shaft seal. Running the pump backwards, even briefly, can chip vanes. The general rules are set out in the standard on general rules and safety requirements for hydraulic fluid power systems.
| Root Cause | How It Damages the Pump | First Preventive Action |
| Particle contamination | Scores vanes and cam ring | Filter and sample the fluid |
| Water in the fluid | Corrosion, loss of oil film | Desiccant breather |
| Entrained air | Aeration and oxidation | Seal suction, submerge returns |
| Sustained high temperature | Oxidation, varnish, hard seals | Fix the heat source first |
| Incorrect viscosity | Leakage or inlet starvation | Verify grade against temperature |
| Misalignment, soft mounting | Bearing and seal damage | Align and use a rigid base |
| Restricted case drain | Raised case pressure, seal leak | Route drain below oil level |
Vane Pump Troubleshooting: Symptoms, Causes, and Fixes
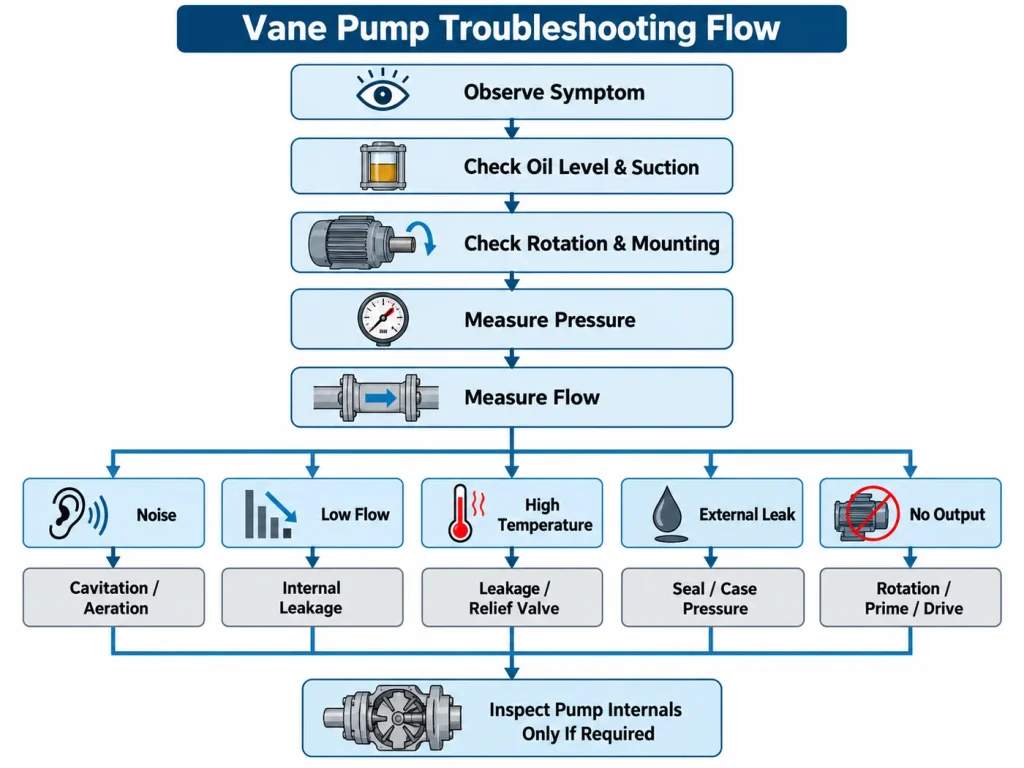
The most efficient order of work is to observe the symptom, check the simplest external cause first, then measure pressure and flow, and only then dismantle the pump. The table follows that sequence so the most expensive step is always last.
| Observed Symptom | Check First | Test | Likely Cause | Action |
| Low system pressure | Relief valve setting | Flow at rated pressure | Internal leakage | Inspect the rotating group |
| Low flow, normal pressure | Suction condition | Reservoir level, strainer | Starvation or aeration | Clean the suction line |
| Whining or rattling | Suction line and oil level | Viscosity, inlet vacuum | Cavitation or aeration | Enlarge and clean the inlet |
| Grinding or rumbling | Bearing and shaft | Shaft run-out | Bearing wear | Replace bearings, realign |
| High oil temperature | Relief valve operation | Case drain flow | Leakage or continuous bypass | Repair pump or resize to duty |
| Oil at the shaft seal | Case drain line | Case pressure | Seal or bearing failure | Replace seal and bearings |
| Fluctuating pressure | Inlet connections | Air ingress | Aeration or unstable relief valve | Seal the inlet, service the valve |
| No output at start-up | Rotation direction | Drive rotation | Wrong rotation, no prime | Correct rotation, prime |
Record the readings. A pump that loses ten percent of its flow between two service visits is a different case from one that loses forty percent in a week.
Does Vane Pump Type Affect Troubleshooting?
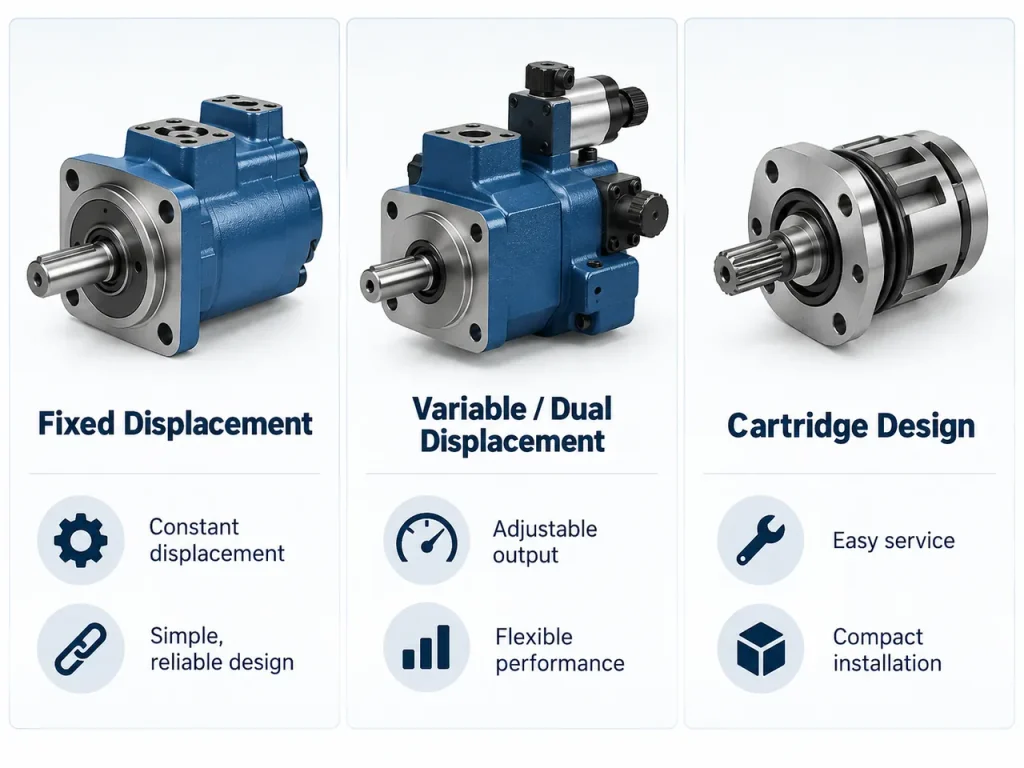
Pump type changes the emphasis of troubleshooting rather than the basic method. Balanced and unbalanced designs differ mainly in how the rotor is loaded, while fixed and variable displacement designs differ in whether there is a control mechanism that can itself fail.
A balanced vane pump uses an elliptical cam ring with two opposing pressure zones, so radial loads on the rotor largely cancel. These units run with lower bearing load, more quietly and for longer, and suit duties where a fixed delivery is acceptable. When a balanced pump loses flow the cause is almost always wear or contamination. An unbalanced pump uses a single pressure zone and an eccentrically mounted circular cam ring, which loads the bearings on one side and is why the design is normally applied in variable displacement form.
Variable pumps add a pressure compensator or control piston that moves the cam ring, and that mechanism brings its own failure modes: a leaking control piston seal, a blocked pilot line, a fatigued regulating spring, or a cam ring stuck in its slide. If a variable pump delivers no flow at all, check the control before opening the pump, because a compensator stuck at zero eccentricity produces the same symptom as a worn rotating group. The wider classification is covered in the guide to types of hydraulic pumps.
How to Prevent Vane Pump Problems
Vane pump service life is governed mainly by fluid cleanliness, oil temperature, and how closely the pump is kept to its rated operating limits. Prevention is therefore mostly a matter of controlling the fluid and the duty cycle rather than repeatedly inspecting the pump itself.
Control Fluid Cleanliness
Set a cleanliness target and hold the filtration system to it: a full-flow return filter, a pressure filter downstream of the pump, and offline filtration where contamination ingress is continuous. Replace elements on schedule, sample the fluid to track particle counts, water and viscosity, and keep the reservoir closed with a breather that excludes moisture.
Stay Within Rated Operating Limits
Treat continuous pressure rating, peak pressure allowance, speed range, viscosity window and maximum fluid temperature as limits rather than targets. Avoid continuous operation at the top of the pressure range, reduce pressure transients by tuning valve response, and allow a low-load warm-up before demanding full pressure. Selecting the pump to match the duty is the single most effective measure, and a specialist vane pump manufacturer can confirm the displacement and pressure rating an application really needs.
Inspection Schedule
| Interval | Task |
| Daily or weekly | Check reservoir level, look for leaks, listen for changes in sound, record oil temperature |
| Monthly to quarterly | Inspect strainer and filter elements, verify relief valve setting, check bolts and alignment |
| Annually or by running hours | Sample the fluid, inspect coupling and bearings, plan rotating group replacement |
Frequently Asked Questions
How do I know whether to repair or replace a vane pump?
If the housing, shaft and cam ring remain within their service limits and a replacement rotating group is available, repair is usually the economical choice. If the housing is cracked, the shaft is grooved under the seal, or the cam ring track is worn beyond its limit, replacement is more reliable. Weigh parts, labour and downtime against a new unit.
Can a vane pump run in reverse?
Most fixed displacement vane pumps are directional and should only be driven in the direction marked on the housing. Running them backwards usually produces little or no flow and can chip the vanes and damage the cam ring quickly. Variable displacement designs can often pump either way, but output is optimised for one direction, so reverse operation is better treated as an emergency capability.
What oil and filtration level should a vane pump use?
Use an antiwear hydraulic oil of the viscosity grade specified for the pump and matched to the expected operating temperature, and keep the fluid inside the pump’s rated viscosity window. Vane pumps tolerate particle contamination less well than gear pumps, so filtration is normally set to a cleanliness target of ISO 4406 18/16/13 or finer, verified by regular fluid sampling.