A vane pump holds its prime on a thin film of oil and a few microns of clearance between the vanes, the rotor slots, and the cam ring. On a new installation, after a cartridge change, or after any repair that opened the circuit, that film does not exist yet. The case, the suction line, and the outlet plumbing are full of air, and the drive is asked to turn before fluid arrives.
Priming a hydraulic vane pump means flooding the pump case, the suction line, and the inlet side of the circuit with clean fluid, venting every air pocket so the pump draws oil instead of air on its first rotation, then raising pressure in controlled steps. Done before the drive runs at speed, it lubricates and cools the vanes, rotor slots, cam ring, and port plates from the first revolution.
The procedure is short, but every step exists for a reason, and the order matters.
What Does Priming a Hydraulic Vane Pump Actually Mean?
Priming establishes a continuous, air-free column of fluid from the reservoir to the pump inlet and fills the pump case itself, so the pump can generate suction and build pressure. It must be repeated every time the circuit is opened.
Pouring oil into the reservoir is not priming. A reservoir at the correct level can still leave a suction hose full of air and a cartridge with nothing but atmosphere between the vanes and the cam ring. Priming covers the pump internals and everything upstream of them.
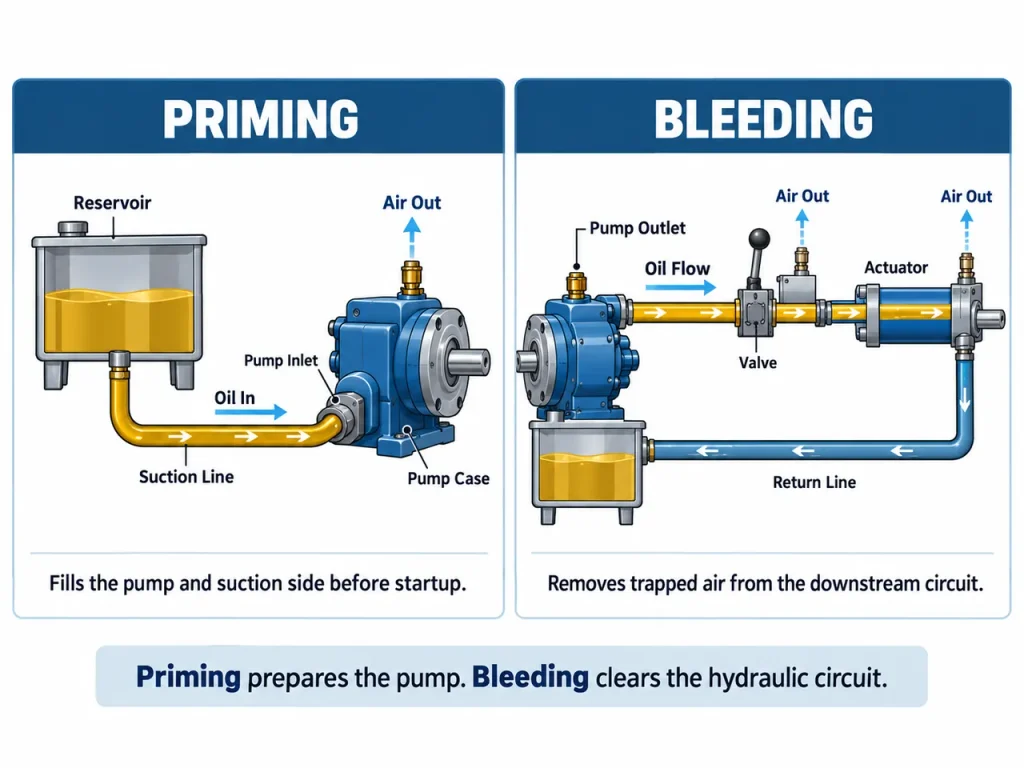
Priming and Bleeding Are Two Different Jobs
The two terms get used interchangeably, which is where procedures go wrong. They remove air from different halves of the circuit.
| Operation | Scope | Method |
| Priming | Reservoir outlet, suction filter, suction hose, inlet fitting, pump case | Pre-fill, flooded inlet, vent port, hand fill |
| Bleeding | Pump outlet, valves, actuators, return line | Bleed screws, low-pressure circulation |
A primed pump feeding an air-locked cylinder still moves erratically, and a bled circuit fed by a dry pump produces nothing.
Why Dry Starting Can Damage a Vane Pump
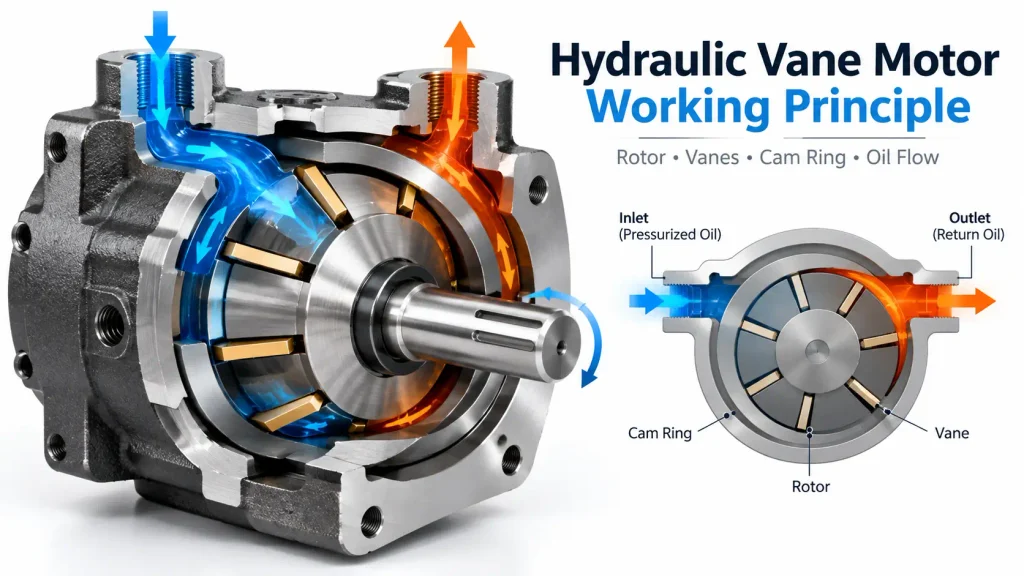
A vane pump relies on fluid for three jobs at once: separating sliding surfaces, carrying heat away, and giving the vanes something to push against so they seat on the cam ring. Remove it and all three vanish together. Vane tips drag across the ring, temperature climbs, and the finish that controls internal leakage is destroyed within seconds. Understanding vane pump working principle explains the narrow tolerance: each vane must slide in its rotor slot while its tip tracks the cam ring, and only a pressurized film keeps those motions from becoming metal on metal.
Air damages the pump a second way. When the inlet is starved or the fluid carries entrained gas, pressure in the low-pressure zone falls far enough for vapor bubbles to form, and those bubbles collapse on the high-pressure side. Repeated collapse pits and erodes metal, the mechanism documented as cavitation. Pitting shows up on vane tips and port plates first.
Do Vane Pumps Self-Prime?
Vane pumps can develop their own suction, and documentation supplied with many units calls them self-priming. That describes a best case, not a guarantee. A pump mounted above the fluid level, fed through a restricted or leaking suction line, or started with a dry case often fails to catch a prime, and each attempt damages the cartridge further.
Why Vane Pumps Can Develop Suction
A vane pump is a positive displacement unit built around an eccentric geometry. A rotor carrying sliding vanes turns inside a cam ring, and the gap between the two changes as it rotates. Where the gap widens, chambers between adjacent vanes expand and pressure falls. Where it narrows, they contract and fluid leaves the outlet. The wider picture of this machine family is covered in What Is a Vane Pump.
Suction depends on speed. Centrifugal force throws the vanes outward until their tips touch the cam ring, creating the seal that separates inlet from outlet. The vanes need a minimum drive speed before that force is enough, and the vacuum it produces is what lifts fluid up the suction line, as described in the reference material on rotary vane pumps. So a pump cannot build suction it lacks the speed to create, and suction can only lift fluid that is available.
Why Self-Priming Fails in Real Installations
The gap between the claim and reality is almost always on the inlet side.
- Pump above the reservoir. Suction lift cuts the pressure available at the inlet.
- Long or convoluted suction line. Every high point collects air the pump must pull through.
- Undersized suction line. High inlet velocity drops pressure before fluid arrives.
- Clogged strainer or filter. A restricted element mimics trapped air and raises inlet vacuum.
- Leaking inlet fitting or shaft seal. The pump draws air instead of oil.
- Cold, high-viscosity fluid. Thick fluid flows too slowly when flow matters most.
- Aerated fluid in the reservoir. A return line discharging above fluid level keeps feeding gas back in.
- Closed outlet path. A check valve that opens only above a set pressure can hold the pump against a blocked path.
Do hydraulic pumps need to be primed? Yes. Positive displacement pumps of any type need fluid at the inlet before the drive runs at speed. Designs differ in how quickly they punish a dry start, but none run safely without fluid.
When Does a Vane Pump Need to Be Re-Primed?
Treat a vane pump as unprimed any time the circuit has been opened, the level has dropped far enough to uncover the suction inlet, or the machine has been idle long enough for fluid to drain back to the reservoir.
New Installation and Cartridge Replacement
Every hose, fitting, valve body, and housing arrives full of air, so if any connection has been broken, assume air is present.
Low Reservoir Level and Suction Side Leaks
When fluid falls below the suction inlet, the pump draws air instead of oil. Topping up is not enough, because the air already inside the case has to be removed too.
Filter Service, Extended Downtime, and Cold Fluid
Changing a suction strainer, replacing a return element, or breaking a pressure line creates entry points for air. Downtime adds a second problem, since fluid drains back and leaves the suction line empty, and cold fluid too viscous to flow cannot displace the air that has collected.
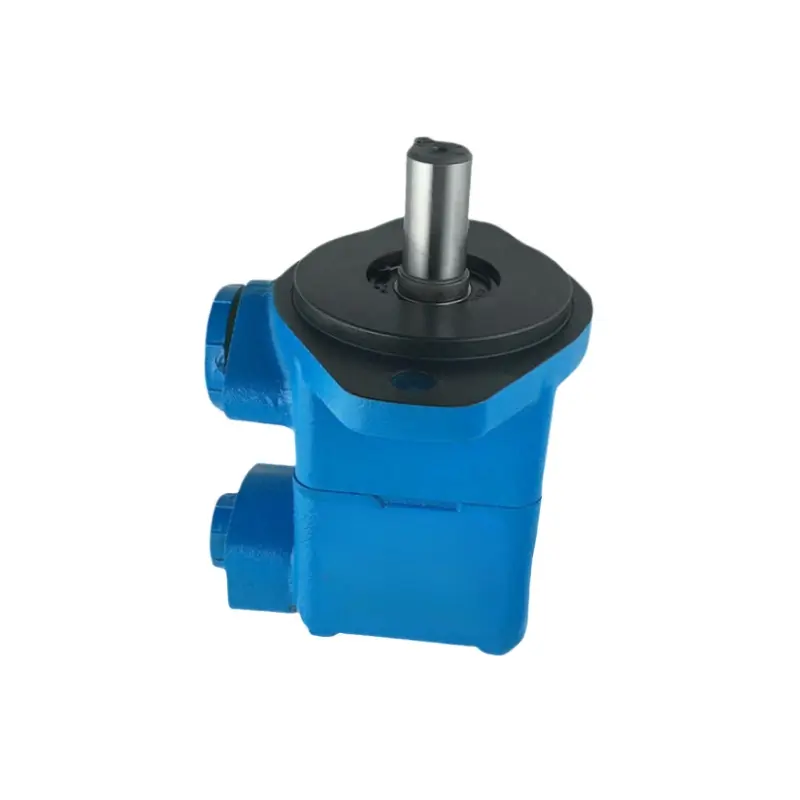
Pre-Start Checks and Tools You Need
Gather everything and verify the basics before touching a fitting. The usual cause of a botched prime is not a technical problem but an interrupted procedure: someone leaves to find a wrench while a suction line sits open to the shop air.
| Item | Why it matters |
| Fluid of the specified grade | Wrong viscosity starves clearances; dirt scores vanes |
| Clean funnel and container | Keeps dirt and water out |
| Hand or transfer pump | Fills the case where gravity is slow |
| Wrenches for suction and bleed fittings | Loose fittings leak air; overtightened ones distort seals |
| Calibrated pressure gauge | Confirms stable pressure after priming |
| Thermometer | Verifies fluid flows freely |
| Manufacturer documentation | Gives fill points, vent locations, torque values |
| Absorbent pads, gloves, eye protection | Contains spills, protects against hot fluid |
| Check | Target condition |
| Reservoir level | Upper sight glass mark, inlet submerged |
| Suction shutoff valve | Fully open |
| Suction line | Sound, fittings tight |
| Filter and strainer | Within interval, correct rating |
| Fluid condition | Clear, no water, no foam |
| Fluid temperature | Within start-up viscosity range |
| Rotation direction | Matches the arrow on the pump |
| Circuit state | Valves centred, unloading path open |
| Case drain line | Connected, unrestricted |
How to Prime a Hydraulic Vane Pump Step by Step
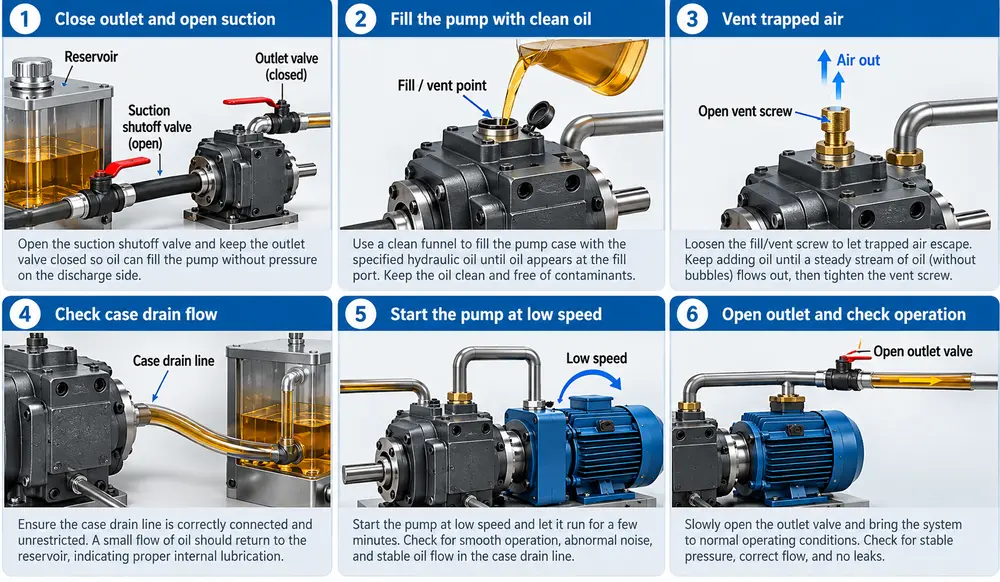
The sequence is fixed: confirm fluid and hardware, flood the case and suction line, purge trapped air, turn the drive slowly and briefly, bleed the downstream circuit, then raise pressure in stages. Reorder the middle steps and air is pushed around the circuit instead of out of it.
Step 1 – Confirm Fluid Level, Viscosity and Cleanliness
Fill the reservoir to the upper sight glass mark with fluid of the specified grade. Even a little dirt, water, or mixed fluid reaches the cartridge and abrades vane tips and the cam ring, and whatever particles are present now will circulate for the whole first operating period.
Step 2 – Pre-Fill the Pump Case and Flood the Suction Line
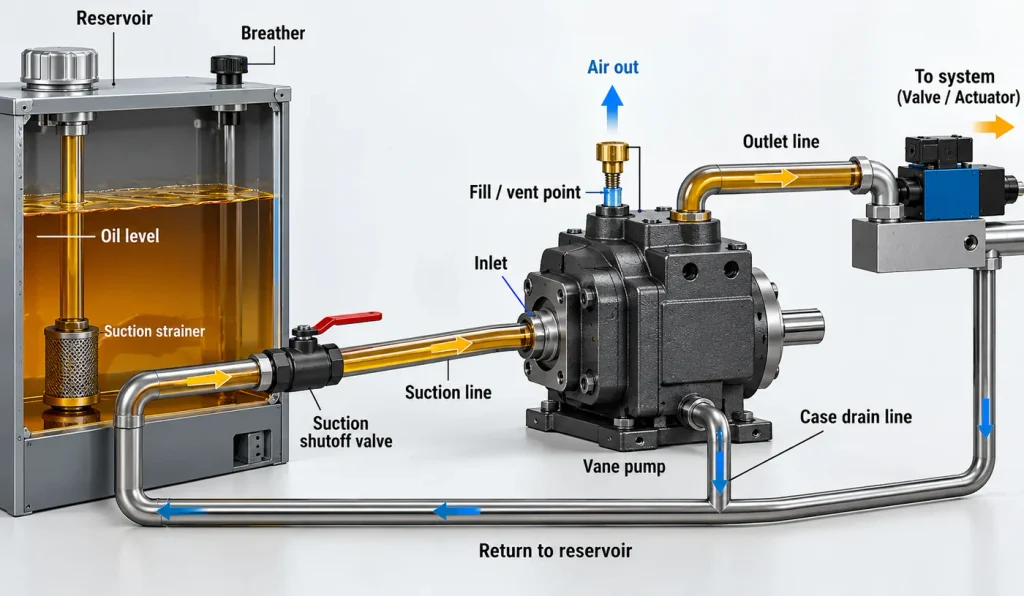
Locate the case drain port, fill plug, or highest port on the housing, remove it, and pour clean fluid in until it reaches the port level. A hand pump speeds this up on larger units. The cartridge should sit in oil before the shaft turns.
Confirm the suction line holds fluid rather than air. Where the reservoir sits above the pump, opening the shutoff valve and briefly loosening the inlet fitting lets fluid flood the line and push air ahead of it. Where the pump sits above the reservoir, this needs a hand pump or a temporary head of oil above the inlet.
Step 3 – Purge Trapped Air From the Pump and Suction Side
Loosen the vent or bleed fitting at the highest point of the suction side and the pump case, just enough to let air escape without flooding. Air pushes out ahead of the fluid, and the fitting can be tightened once a steady, bubble-free stream appears. To bleed air out of the pump itself, work from the highest point downward, repeating at each fitting, because anywhere fluid is absent is somewhere air remains.
Step 4 – Jog or Crank the Drive at Low Load
With the circuit unloaded, jog the drive for one or two seconds and stop. A correctly priming pump produces a smooth, low hum, while a whine or rattle means air is still moving through the cartridge. Repeat the cycle several times with short pauses so fluid can refill the voids. Where the prime is difficult, rotate the shaft by hand first, if the design allows, to confirm the drive turns freely. If noise persists, recheck the suction fittings, level, and inlet valve rather than jogging again.
Step 5 – Bleed the Downstream Circuit
With the pump drawing fluid, open the bleed screws on the pressure line, control valves, and actuators, starting closest to the pump and working outward. Crack each fitting at low pressure and close it once solid fluid flows without bubbles. Skipping this step produces jerky cylinder motion and spongy controls later in the shift.
Step 6 – Increase Pressure Gradually
Raise the load in increments, pausing to check the gauge and inspect connections for weeping. Fittings that seal at low pressure sometimes leak at full load. Priming is complete when the system holds operating pressure with no abnormal noise, no leaks, steady readings, and fluid free of foam.
Manual Priming Methods When the Pump Will Not Catch
If the pump refuses to prime after several careful jog cycles, switch to a manual method rather than spinning it further. Working out how to manually prime a pump usually comes down to four approaches.
- Hand feed through the case fill port. Pour fluid into the highest port until the cartridge is full, then reconnect the case drain.
- Hand rotation with the outlet vented. Turn the shaft by hand where permitted, with a bleed point open so trapped air has somewhere to go.
- Flooded inlet by fluid head. Temporarily raise the reservoir or outlet plumbing so a column of oil sits above the inlet.
- Open the pressure side bleed point. A check valve holding pressure against the pump prevents flow until a bleed point is cracked open.
If none produce flow, the cause is usually a suction leak, a blocked inlet, or damage already done.
How Priming Requirements Vary by Pump Design
Every common hydraulic pump design needs fluid at the inlet before it is driven, but the three families differ in how they draw fluid in and how they behave with air present. Those differences set how much assistance each one needs during priming.
| Dimension | Gear pump | Vane pump | Piston pump |
| Suction mechanism | Volume carried between gear teeth | Expanding chambers between vanes and cam ring | Pistons drawing fluid through porting |
| Inlet sensitivity | Tolerant of moderate lift | Sensitive to inlet vacuum | Highly sensitive to case pressure |
| Behaviour with air | Handles air poorly | Air bound easily above the tank | Handles air very poorly |
| Priming emphasis | Case pre-fill, sound suction line | Case pre-fill, venting, slow jogging | Flooded case drain, gradual ramp |
Read that as a description of behaviour rather than a ranking of durability. The broader comparison is set out in Types of Hydraulic Pumps, and the wider classification of positive displacement machines appears in the reference material on hydraulic pumps.
Common Priming Mistakes and How to Avoid Them
Most early vane pump failures after a commissioning or repair trace back to a step that was skipped, rushed, or performed out of order, rather than to a faulty pump.
Mistakes That Cause Immediate Damage
- Bringing the drive to full speed too early. Full speed with air in the cartridge cavitates instantly.
- Wrong fluid viscosity or cleanliness. Thick fluid starves the inlet, thin fluid loses film strength, dirt abrades surfaces.
- Ignoring the case drain line. A blocked drain raises case pressure and can blow the shaft seal.
- Skipping downstream bleeding. Air-locked actuators produce unsafe, unpredictable motion.
- Over-tightening vent and suction fittings. Distorted seals create the leaks that defeat the next attempt.
- Failing to recheck after warm-up. Thermal expansion loosens fittings, and dissolved air comes out of solution.
Troubleshooting a Pump That Will Not Prime
| Symptom | Likely cause | Immediate action |
| Drive turns, no flow or pressure | Air in the suction line, blocked inlet | Stop, recheck inlet path, re-vent |
| Noise rising with pressure | Restricted inlet, clogged strainer | Check inlet vacuum and line sizing |
| Flow builds then collapses | Air drawn in through a fitting or seal | Inspect suction connections and seal |
| Pump turns but circuit stays dead | Outlet held closed by a check valve | Crack a bleed point, inspect the valve |
| Fluid foams in the reservoir | Aeration from the return line or a leak | Lower the return line, find the source |
| Housing runs hot at normal load | Poor lubrication film, internal air | Verify grade and temperature, re-prime |
Where the diagnosis points at the valve, replacement is often faster than repeated attempts to bleed around it. Sourcing a correctly rated unit from a Check Valve Manufacturer removes one variable from the next startup attempt.
How to Tell a Vane Pump Was Not Primed Properly
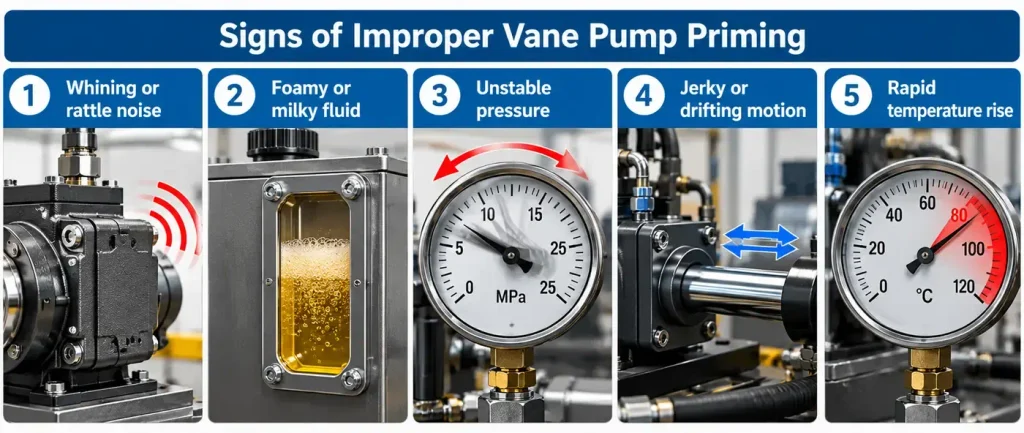
A pump that was not primed properly usually announces itself within minutes: the sound changes, the fluid changes appearance, or the pressure gauge stops behaving. Treat any of these signs as a reason to stop and repeat the procedure.
| Sign | Indicates | Why it matters |
| High-pitched whine or metallic rattle | Cavitation or metal to metal contact | Surfaces erode every revolution |
| Jerky or drifting actuator motion | Compressible air still trapped in the circuit | Control becomes unsafe |
| Foamy or milky fluid in the reservoir | Entrained air, or free water | Film strength falls and heat builds |
| Gauge needle that will not settle | Air still circulating | Duty cannot be judged from the reading |
| Temperature rising faster than normal | Compressed air and friction without useful work | Accelerates fluid and seal breakdown |
| Falling volumetric efficiency | Internal leakage through damaged vane tips | Dry start damage is measurable |
None of these improve on their own, and running through them converts a recoverable issue into a cartridge replacement. Cleanliness targets, filtration ratings, and the wear checks that verify vane condition belong to the same maintenance logic. A Vane Pump Manufacturer that publishes cartridge details and start-up guidance is worth more than a lower purchase price.
Frequently Asked Questions
What fluid temperature should be reached before priming a vane pump?
Aim for a start-up viscosity inside the range stated for the pump, which in practice means warming fluid that has sat in a cold environment until it flows freely. At low ambient temperatures viscosity rises sharply, flow resistance through the suction line increases, and the drive motor carries a heavier starting load. Preheating the fluid, or running at zero load before applying pressure, brings it into a workable range.
Can one dry start permanently damage a vane pump?
It can, and the damage is often irreversible even when the pump appears to recover. A dry start destroys the fluid film separating vane tips from the cam ring, and scoring begins immediately. Once the surface is scored, internal leakage rises and volumetric efficiency drops permanently. The pump may run for weeks before the loss becomes obvious, which is why a careless startup is treated as a replacement event.
How do I prime a vane pump when the inlet sits above the reservoir?
Suction lift is the hardest configuration to prime, so it needs the case pre-filled by hand and the inlet purged before the drive turns at all. Fill the housing through the highest port, renew the suction fittings and seals, and where the design allows, temporarily arrange a head of oil above the inlet. Expect to repeat short jog cycles more often than on a flooded installation.